


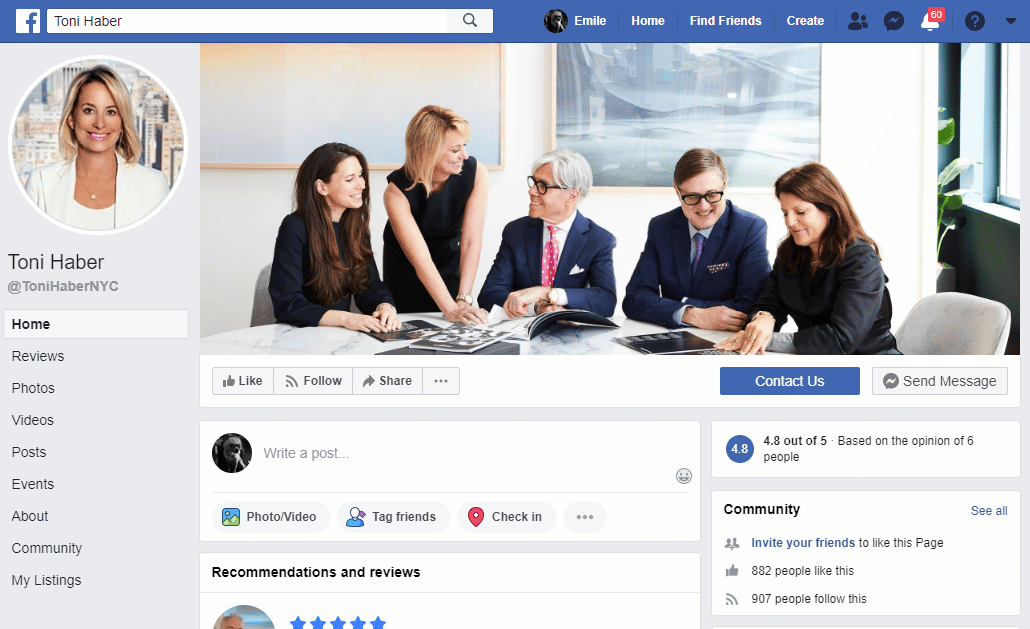
Although it may seem a little bit dated in the age of TikTok, your real estate agent Facebook page is still one of the most important elements of your brand online. Yes, really.
While Facebook’s traffic has taken a small hit recently, there is one group that still uses Facebook more than any other platform. Baby boomers. In other words, the people in your farm area who are still statistically most likely to buy and sell real estate.
To get you started, we put together this guide on how to set up a real estate agent Facebook page that’s more than just an online brochure. We’ll show you tricks to maximize engagement, lead capture, set up a platform for advertising, and more.
So, grab a cup of coffee, turn off your phone, and learn our 10 steps to creating a real estate agent Facebook page in 2022.
1. Conduct a Personal/Team Branding Audit

Before you start any social media marketing campaign for your real estate business, your first step should always be to take a quick step back and assess your personal branding honestly.
I know what you’re thinking: You put a lot of work (and maybe money) into your branding already, so chances are everything’s hunky-dory, right?
Not so fast.
The very fact that you put a lot of time and money into your brand is often the same reason you do not see it as it is. Instead, you put on rose-colored glasses and hardly ever take them off. How does your branding look when you take them off?
Overestimating the quality of work you’ve put a lot of time, money, and effort into is so common behavioral economists have a name for it. The sunk cost fallacy. Since you’ve invested so much into your brand, you tend to value it more, even if it’s not as good as it should be.
‘Why Did Century 21, Halstead & Coldwell Banker All Recently Spend Millions Rebranding?’

Well, for many reasons, but a big one was that these legacy real estate brokerages were all somewhat stuck in the past. They saw others change but decided they had too much invested to change with them. Then they decided to do what I’m suggesting you do today, which is to look at their branding with fresh eyes and embrace change.
Don’t worry―we’re not suggesting you spend a ton of money on rebranding. Chances are that you might be OK or might end up spending $100 or so to tweak a few things. Either way, commit right now to look at what you’ve got with fresh eyes. Sound good? We thought so. To get started, here are a few things you should try and assess.
Your Headshot
Is your headshot working? Does it make you look trustworthy, confident, and competent? How’s the lighting? Is it blurry or out of focus? Are you dressed professionally enough? How about your smile? Is it genuine or forced?
Your Logo
While agents don’t necessarily need a logo, having one can give you that little push over the edge that might help a homeowner decide to send you a message on your Facebook page.
Your Slogan & Marketing Copy
Like logos, a slogan is a nice-to-have element, but not necessary for most agents. However, you can and should have some copy ready to go that describes your unique value add for your leads. If you don’t, no sweat. You can work on it as you build your Facebook page today.
Revisiting Your Mission, Vision & Values

They say the best time to plant a tree was 20 years ago, but the second best time is today. When it comes to your business, this is especially true. That’s why there is no bad time to sit down and revisit your mission, vision, and values. After all, this is the core identity of your brand.
Knowing what difference you want to make in your community (your mission), where you see yourself in 10 years (your vision), and what you value (your values) will greatly increase the likelihood of people resonating with your brand and hiring you.
If you want to learn more about creating an inspiring mission, vision, and values statement for your business, Close contributor and 26-year real estate veteran Sean Moudry has an excellent guide here.
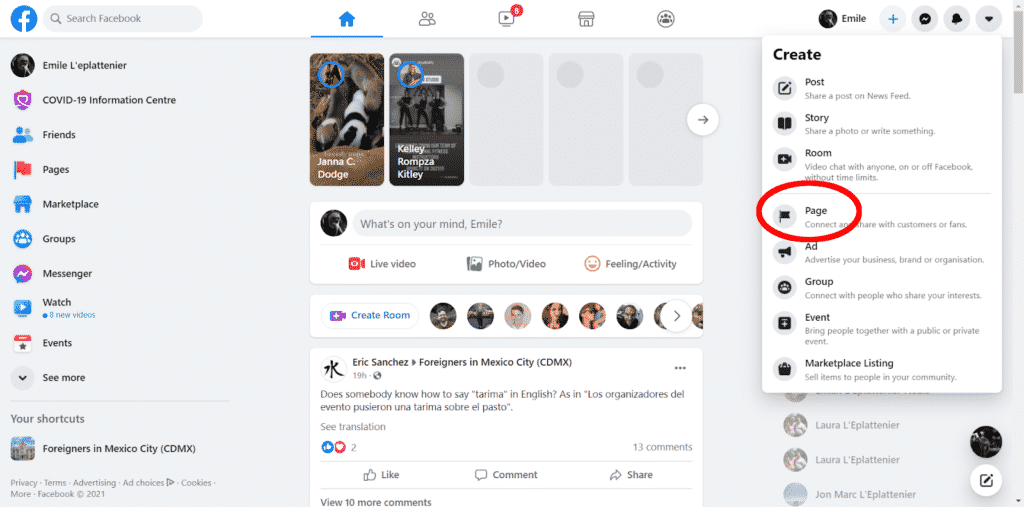
2. Set Up a Facebook Business Page
As you may have already guessed, the first step to setting up a real estate agent Facebook page is to head to Facebook and create a business page. To do this, you’re going to need a personal Facebook page too, so if you don’t already have one, sign up for one. Oh, and don’t worry―you can keep your business page and personal pages separate if you want.
To get started, go up into the right-hand corner of your personal Facebook page and click on the arrow, then “Page in the drop-down box,” and then “Business or Brand.”
Next, fill in your business details like name, phone number, email, and address. For your name, don’t just use your first and last name. Instead, add something like “Realtor” or “Real Estate Agent.” This will help people differentiate between your personal and business pages.
For “Category,” the only option that Facebook has for Realtors is “Estate Agent” that, oddly enough, is a British term for a real estate agent. Because there’s no other choice, choose “Estate Agent” as your page category.
Once you’re done naming your page and adding a description, click on “Create page” in the left-hand column.
Next, you’ll add a profile picture and cover image.
3. Upload Your Profile Picture
Now, you’ll have a blank real estate Facebook page with your name and some other personal information filled in. Let’s personalize it a bit by uploading your headshot. Scroll down to the “images” section on the left side of your screen to upload a headshot.
You can use any picture that you’d like, but we always strongly suggest agents use a headshot that makes them look trustworthy, competent, and confident―in that order.
As far as dimensions go, don’t worry too much about making it “high-res.” Make sure your picture is at least 250×250 pixels, however. Your profile picture will be 170×170 on desktop computers and only 128×128 on phones, so make sure your head is centered properly, and people can see your eyes―even on small screens.
If you don’t have a good headshot to use, have one taken before you set up your page. Chris Linsell has some excellent pointers on getting a great headshot here.
4. Upload Your Cover Image
Now that you’ve got a headshot on your page, let’s upload a cover image. A cover image is the large, rectangular image that sits behind your profile picture.
Cover images should be at least 820 pixels wide by 312 pixels tall. If you upload an image that’s too small, Facebook will stretch the image to fit. While that might not be a huge deal for an 800×300 image, it will make a 400×150 image look blurry.
A good cover image is one that is attractive, complements your profile picture and, hopefully, says something about what you do.
Where to Get High-quality Professional Cover Images
If you don’t have access to high-quality cover images that you have the right to use, you should check out Unsplash. They have 100% free stock photography that is head and shoulders above the free offerings on other sites like Shutterstock. Even better, the more you search the site, the more photos you’ll recognize. Many large businesses and publications use Unsplash, including The Close.
The only small drawback with Unsplash is that it can be a little hard to find exactly what you want. It has a much smaller portfolio than sites like Shutterstock, BigStock, and Adobe Stock. The benefit, of course, is that you have less junk to sort through to get the good stuff.
If you just can’t find a specific image on Unsplash, then give Adobe Stock a try. It’s not free, but you can probably get away with only spending $20 or so for a one-month trial, where you can download all the images you’ll ever need in your career.
The other nice thing about Adobe Stock is that it sells stock videos as well. While they’re a bit more expensive, you might be able to find a professional-looking video that works as a cover image video.
Adding Text or Your Logo to Your Cover Image
You can also add text or a logo to your cover image. Realize that Facebook will cut 90 pixels off the left and right side of your cover image on mobile, so make sure your text is centered and not too close to the edges, like our example above. If you don’t, the text will get cut off and look unprofessional.
If you want to add a logo, slogan, or other text to your cover image, you have a few options. First, you can try your hand on a design app like Canva, or you can head over to Fiverr and hire someone to make you a professional cover image starting at $5.
Adding a Video Cover Image
If you’d like, you can also add a video or slideshow as your cover image. To upload a video, make sure your video is at least 820 x 312, around 30 seconds long, a maximum of 1080p in a MOV or MP4 format, and less than 1.75GB. You can have music or other audio, but it will be turned off by default, and your visitors will have to click on the speaker icon to turn on the sound.
This might be tricky if you’re not good with video editing software, so this is another ideal opportunity to outsource to someone on Fiverr.
For an example of a great real estate agent Facebook page that uses a video as a cover image, check out Corcoran’s The Deanna Kory Team’s Facebook page here.
To add a video, just click on “add cover image” and upload your video. You can always switch your cover image by clicking on the upper left corner of your cover image on your page.
Adding a Slideshow Cover Image
Slideshows are much easier to set up. Put a few pictures you like in a folder and click on the little camera icon in the upper left corner of your cover image. Next, upload your pictures in the order you want them on your page.
Unfortunately, Facebook will not scroll through your cover images automatically when a user visits your page (as the name “slideshow” suggests). Instead, they will have to click on the left or right arrows to look at the other photos.
Once you’ve named your page, added a description, headshot, and cover image, click “Save.”
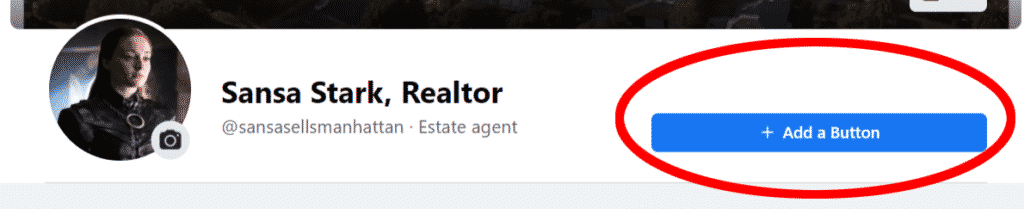
5. Add Call-to-Action Buttons to Your Facebook Real Estate Page
At this point, we have a page that’s starting to look like something. We have our contact information, profile picture, cover photo or video, and some other basic information about your business. Next, let’s add a call-to-action (CTA) button to give our visitors an easy way to reach out.
You can also set your CTA button to say schedule an appointment, download your app, or learn more about you.
Click on the big blue “Add a button” button to get started.
6. Create an Easy to Remember @Username for Your Facebook Page
Now that you have your Facebook page mostly built, it’s time to give it a name. So go back to your Facebook homepage and click on “Pages,” then your newly created business page. Next, click on “Create @username” below your page name.
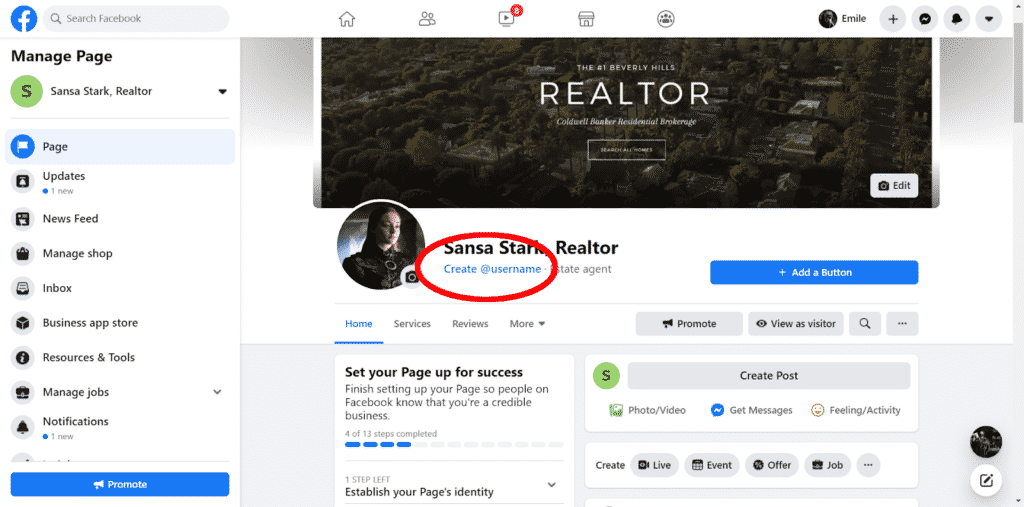
Don’t worry―you don’t need to reinvent the wheel here. Come up with something easy to remember that says something about your business. Some agents just use their business name, like “SansaStarkRealty,” while others get a bit more creative, e.g., “@SansaSellsManhattan.”
7. Preview How Your Page Will Look for Visitors on Desktop & Mobile
Once you have your CTA buttons set up and have named your page, click on the “View as Visitor” button.

This will show you what your page will look like to your visitors. Anytime you make changes to your page and want to see what they actually look like, click this button. Make sure to check your page out on a desktop and on mobile to make sure it’s legible and looks good on both.
If everything looks good, then congratulations. You’re almost ready to publish your page and start generating leads. If you have some tweaks to make to copy or graphics, don’t worry. Your page will grow and evolve over time, and no one has even seen it yet besides you.
Here’s what our test page looks like so far:
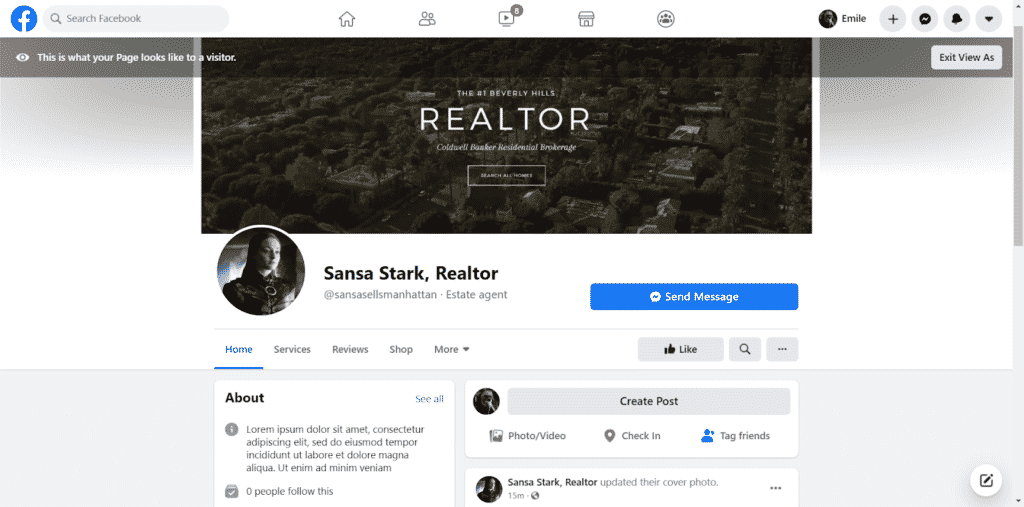
If everything looks good or you want to make more edits, click on the “Exit View As” button on the top right.
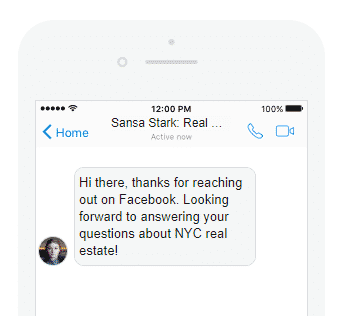
8. Set Up a Facebook Messenger Auto-reply
Believe it or not, Facebook Messenger can be a powerful tool to market yourself. You can set up automated messages, and even program simple (or complicated) chatbots to engage with your visitors’ commonly asked questions to screen out the lookie-loos. Even better, Facebook even offers a piece of code that will allow you to use Facebook Messenger on your own website.
While we can’t cover everything about Facebook Messenger marketing in this article, don’t worry. We have an entire article dedicated to Facebook Messenger marketing here.
For today, let’s just quickly go over how to set up a simple auto-reply for your Facebook Messenger on your page.
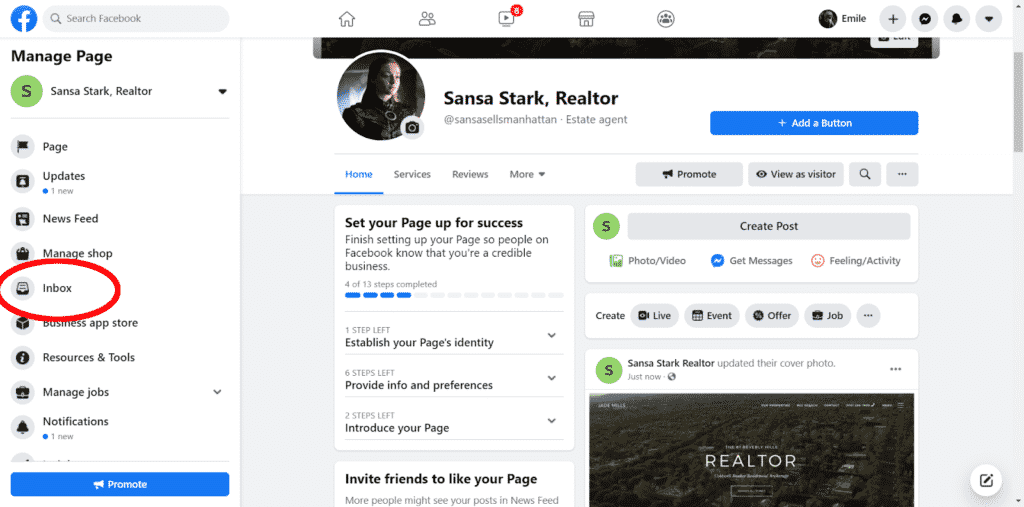
In the “Manage Page” column on the left, click on “Inbox.”
Here, you can set up an away message as well as an auto-reply that will greet every person who messages you on Facebook from your page.
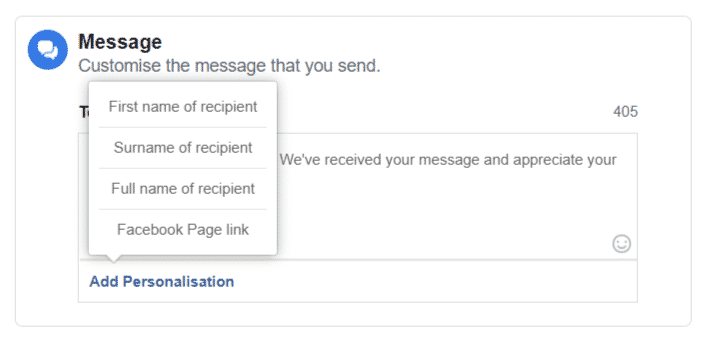
To set an auto-responder, click on “automated responses.” Then, click on “edit” under “instant reply” in the right column and write your auto-reply message in the box. You can also customize your auto-reply to include the person’s first name. You’ll see a preview of what your message looks like on a phone to the right.
To customize the first name field, click on “Add Personalization,” and then select “First Name of Recipient.”
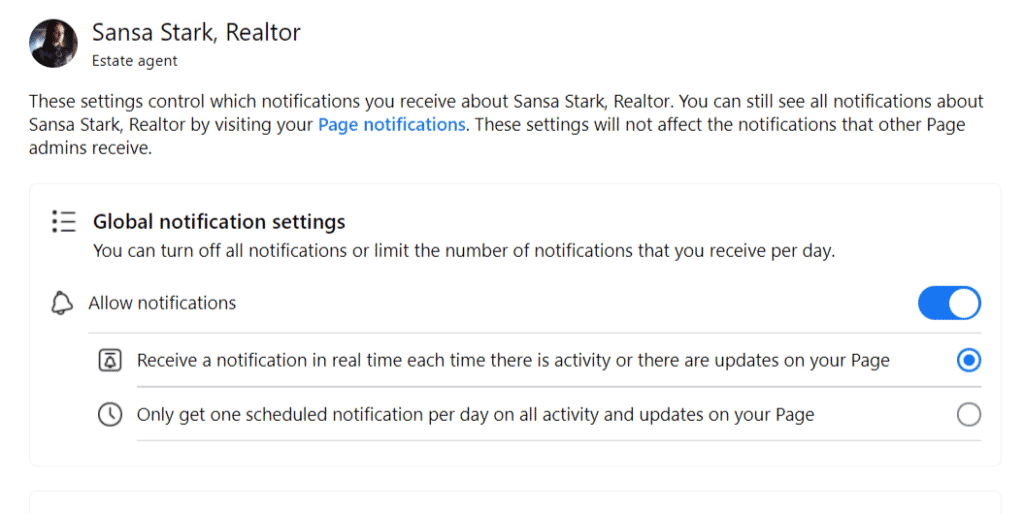
9. Set Notifications to Push Notification
Since instant response time is expected on social media platforms like Facebook, you’re going to want to get notified as soon as someone “Likes” your page, comments on a post, or reaches out to you with a question. Here’s how to set that up.
In the “Manage Page” bar on the left, click on “Settings” and then “Notifications.” Make sure “Get a notification each time there is activity on your Page or an important Page update” is selected. Then, scroll down and turn on text messages as a way to notify you of activity on your page. While you can certainly use the Facebook app, we recommend getting texts instead and just visiting Facebook on your mobile browser.
10. Create Your First Boosted Post
One issue with marketing your business with your Facebook page is that, no matter how many people “like” your page, the odds of getting your posts regularly seen by them are small. Sure, engaging with people and then drawing them to your page to vet you still works, but you might find your everyday posts struggling to get views, likes, and comments.
That’s where boosted posts come in. If you create a post about, say, an upcoming open house, Facebook allows you to “boost” that post by paying a few dollars. Keep in mind this is not a full-blown Facebook ad, but can be very effective nonetheless.
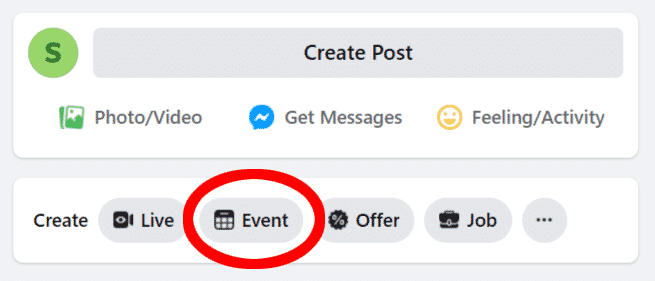
Here’s how to create a post on Facebook and boost it. For this example, we’ll create a simple open house post to boost.
Go to your Facebook page and click on “Event” to the right of the “Create” bar.
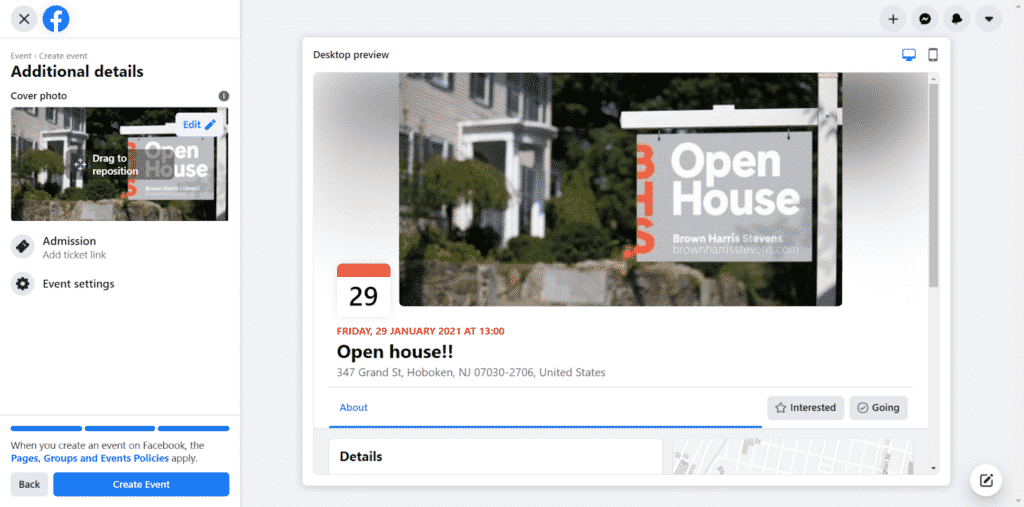
Add the date, time, and location for your open house. Next, decide what pictures or videos you want to use to promote your open house. For example, you might want to go with a great picture of the listing, or maybe a graphic you create or hire someone on Fiverr to create for you.
You can also use Facebook to force users to answer questions before RSVPing for the open house. The only issue is that generally speaking, the more hoops you make people jump through, the fewer RSVPs you’ll get. If you want to ask for a phone number or if they’re working with a broker, scroll down to “Admission,” and then click on “custom questions.”
To make your event live, click on “Create Event.”
OK, now your post is published, but you won’t get many people to see it without boosting it. Here’s what our published open house post looks like:
To boost the post, click on “Boost Event” on the right side of the page next to the megaphone graphic. The first thing you’ll see will be a nondiscrimination warning. Click “Accept.”
Now, you can edit your boosted posts creative if you want. Under format, you can use a single image, a video, or a slideshow of pictures. For our ad, we’re just going with one static picture, so we’re selecting a single image.
Next, click on “Audience.” While you used to be able to target people by many different demographic categories, now you can only choose basic categories like age and location. For our open house, we’ll choose 25-65 as the age and “People in your local area” as the audience.
Once you have your creative and audience set, choose how long you want the ad to run and your budget. Approximately $20 should be plenty to promote an open house. However, keep in mind that the more exposure people have to your boosted post, the more likely they are to engage with it. So, set your duration for say, five days, and your budget for $20. You can always tweak this once you find out how many leads you get from your ad.
Choose your payment option, agree to their terms of service, and then click “Boost” to boost your ad.
Congratulations! You now have a boosted post on Facebook, which will be an excellent way to drive traffic to your open house.
If you want to learn more about creating ads on Facebook, check out our in-depth article on Facebook ads for real estate.
Over to You
Because so many of your potential leads are still using it, setting up a real estate agent Facebook page might be one of the best lead generation and marketing projects you can do. Once you have a basic page set up, you can start promoting open houses via promoted posts and start placing laser-targeted ads to generate buyer and seller leads.

Tell us about you so we know what to send.